

Introduction
In the world of DIY electronics and prototyping, two names stand out prominently: Arduino and Raspberry Pi. These versatile microcontroller platforms have revolutionized the way we approach projects, making technology more accessible to enthusiasts, hobbyists, and professionals alike. But which one should you choose for your next project? In this article, we’ll delve into the differences between Arduino and Raspberry Pi, helping you make an informed decision.
Table of Contents
Understanding Arduino
What is Arduino?
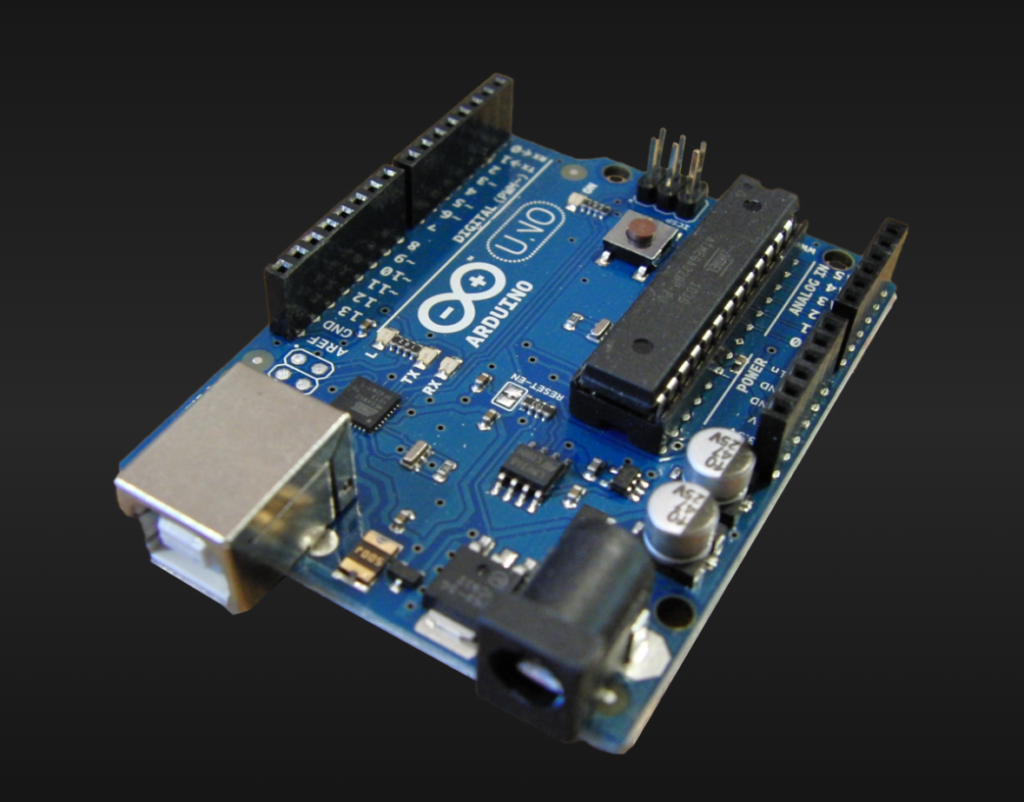
Arduino is an open-source electronics platform that comprises both hardware and software components. It was created to simplify the process of designing and building electronic projects, making it accessible to a wide range of people, from beginners to experienced engineers. Arduino is particularly renowned for its ease of use and versatility.
Hardware Component
At the heart of an Arduino board is a microcontroller, which is a small, integrated circuit that serves as the brain of the system. The most commonly used microcontroller in Arduino boards is from the ATmega series, such as the ATmega328P.
Arduino boards also include other essential hardware components, such as voltage regulators, input/output pins (known as GPIO pins), LEDs, and a USB interface for programming and power supply.
Software Component
Arduino provides a user-friendly Integrated Development Environment (IDE) that enables users to write, compile, and upload code (known as sketches) to the Arduino board. The Arduino IDE is available for Windows, macOS, and Linux, making it accessible to a broad audience.
Advantages of Arduino
Arduino offers several advantages that contribute to its popularity among electronics enthusiasts, educators, and professionals:
- Beginner-Friendly: Arduino is designed with beginners in mind. The IDE features a simple and intuitive interface, and the programming language is easy to grasp, making it an excellent platform for those new to electronics and coding.
- Extensive Community Support: Arduino has a vast and active user community. This means there are numerous online resources, forums, and tutorials available to help users troubleshoot issues and find inspiration for their projects.
- Wide Range of Compatible Shields and Sensors: Arduino boards can be expanded with various shields and sensor modules, allowing users to add specific functionalities to their projects easily. Whether you need to connect to the internet, work with sensors, or control motors, there’s likely a shield or sensor available for your needs.
- Low Power Consumption: Arduino boards are known for their energy efficiency, making them suitable for battery-powered projects that need to run for extended periods without frequent battery changes.
- Real-Time Control: Arduino is well-suited for real-time applications where precise timing and control are necessary. It can handle tasks like reading sensor data and responding to inputs with minimal delay.
Limitations of Arduino
While Arduino is a versatile platform, it does have some limitations that may influence your choice when selecting a development platform for a project:
- Limited Processing Power: Arduino boards are equipped with microcontrollers that have limited processing power compared to more powerful computing platforms like Raspberry Pi. This limitation may impact the performance of complex tasks or applications.
- Limited Memory: Arduino boards typically have limited program memory (flash) and RAM, which can constrain the size and complexity of programs you can run.
- Not Suitable for Complex Applications: Due to its hardware limitations, Arduino is not the best choice for applications that require advanced graphics, heavy data processing, or multitasking.
What is Raspberry Pi?
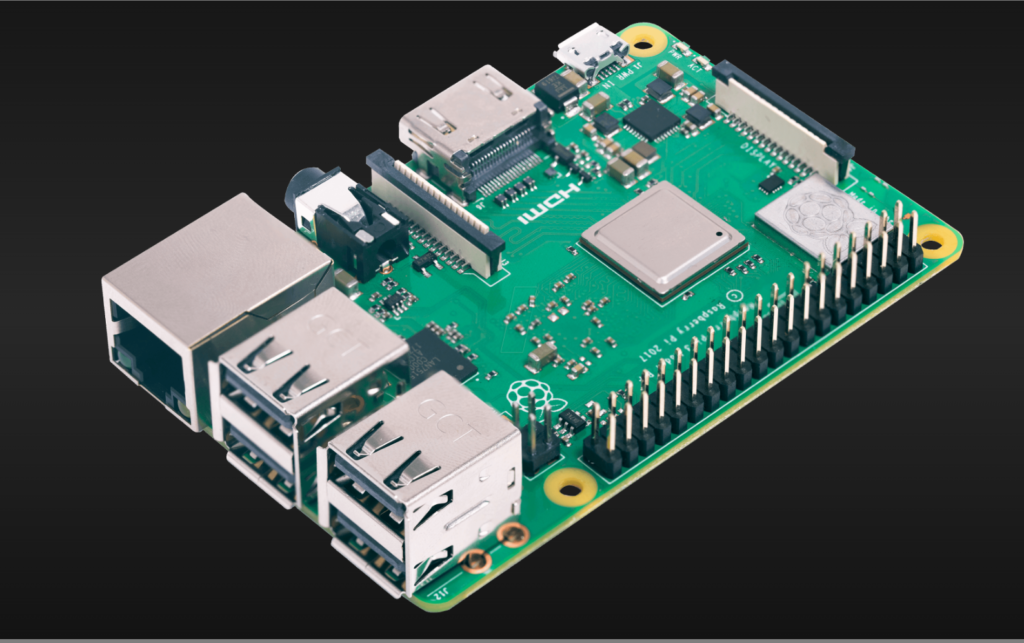
Raspberry Pi is a popular single-board computer (SBC) designed to promote computer science education and facilitate DIY electronics projects. It was developed by the Raspberry Pi Foundation, a UK-based charity organization, with the goal of making computing more accessible and affordable to people worldwide.
Hardware Component
The core of a Raspberry Pi board consists of a system-on-a-chip (SoC) that includes a central processing unit (CPU), a graphics processing unit (GPU), RAM (memory), and other essential components. Unlike Arduino, which primarily uses microcontrollers for real-time control, Raspberry Pi is a full-fledged computer capable of running a wide range of software applications.
Software Component
Raspberry Pi typically runs the Raspbian operating system, a Linux-based distribution optimized for the Pi’s hardware. Users can install various other operating systems, including Ubuntu, Fedora, and more, depending on their project requirements.
Advantages of Raspberry Pi
Raspberry Pi offers several advantages that make it a popular choice for diverse applications:
- High Processing Power: Raspberry Pi boasts a significantly more powerful CPU compared to Arduino. This makes it capable of handling a wide range of computing tasks, from web browsing and office applications to multimedia processing.
- Abundant RAM and Storage Options: Raspberry Pi models come with varying amounts of RAM, and they typically use microSD cards for storage. This flexibility allows users to choose a model that best suits their project’s memory and storage requirements.
- Versatility in Application: Due to its computational power and support for various programming languages, Raspberry Pi can be used for a wide array of applications, including web servers, media centers, IoT (Internet of Things) devices, and robotics.
- Excellent Multimedia Capabilities: Raspberry Pi’s GPU capabilities make it a great choice for multimedia applications. It can handle HD video playback, 2D and 3D graphics, and audio processing, making it ideal for home theater setups and gaming projects.
Limitations of Raspberry Pi
Despite its many advantages, Raspberry Pi also has some limitations:
- Steeper Learning Curve: Raspberry Pi, being a full-fledged computer, may have a steeper learning curve for beginners, especially those new to Linux and computer programming.
- Higher Power Consumption: Compared to microcontrollers like Arduino, Raspberry Pi consumes more power. This can be a consideration for battery-powered projects or situations where energy efficiency is crucial.
- Limited Real-Time Control: While Raspberry Pi is capable of real-time tasks, it’s not as suitable as Arduino for applications that require extremely precise timing and minimal latency.
Hardware Comparison
Microcontroller vs. Single-Board Computer
Arduino:
- Microcontroller-Based: Arduino is centered around a microcontroller, typically from the ATmega series, such as the ATmega328P. Microcontrollers are compact integrated circuits designed for real-time control tasks. They excel at tasks that require precise timing and minimal power consumption.
- Limited Computing Power: Microcontrollers have limited processing power compared to full-fledged computers like Raspberry Pi. They are best suited for simpler tasks that don’t require extensive computational abilities.
- Real-Time Control: Arduino’s microcontroller is optimized for real-time control, making it suitable for applications like robotics, sensor interfacing, and automation.
Raspberry Pi:
- Single-Board Computer: Raspberry Pi, on the other hand, is a single-board computer (SBC) with a more robust CPU and GPU. It is essentially a small computer with processing power that rivals entry-level desktops.
- General-Purpose Computing: Raspberry Pi can handle a wide range of general-purpose computing tasks, making it suitable for applications like web browsing, word processing, multimedia playback, and more.
- Less Emphasis on Real-Time Control: While Raspberry Pi can handle real-time tasks, it’s not as optimized for real-time control as microcontrollers. It’s better suited for applications that prioritize computational capabilities over strict real-time requirements.
Processing Power
Arduino:
- Limited Processing Power: Arduino boards feature microcontrollers with limited processing power, typically running at clock speeds measured in megahertz (MHz). This limits their ability to execute complex computations or run resource-intensive software.
- Suitable for Simple Tasks: Arduino is ideal for simple tasks like reading sensors, controlling motors, and basic decision-making processes.
Raspberry Pi:
- High Processing Power: Raspberry Pi boards are equipped with more powerful processors, with clock speeds ranging from hundreds of megahertz (MHz) to several gigahertz (GHz). This makes them capable of handling tasks like running a web server, handling multimedia, and even light gaming.
- Multitasking Capabilities: Raspberry Pi’s processing power allows it to handle multitasking efficiently, making it suitable for applications that require running multiple software processes simultaneously.
RAM and Storage
Arduino:
- Limited RAM: Arduino boards typically have limited RAM (random-access memory), often measured in kilobytes (KB) or a few megabytes (MB). This limits the size and complexity of programs that can be run.
- No Onboard Storage: Arduino boards do not have onboard storage for programs or data. Code is loaded onto the microcontroller’s flash memory, and external storage solutions must be used for data storage.
Raspberry Pi:
- Variable RAM: Raspberry Pi models come with varying amounts of RAM, ranging from 256MB to 8GB or more. This allows users to choose a model that suits their memory requirements.
- MicroSD Card Storage: Raspberry Pi boards use microSD cards for storage. Users can choose the size of the microSD card based on their storage needs, making it a flexible storage solution.
GPIO Pins and Expandability
Arduino:
- GPIO Pins: Arduino boards come with a set of GPIO (General-Purpose Input/Output) pins. These pins can be used to interface with various sensors, actuators, and external devices.
- Expandable: Arduino boards can be expanded with additional hardware modules known as shields. These shields can add functionalities such as WiFi connectivity, GPS, motor control, and more.
Raspberry Pi:
- GPIO Pins: Raspberry Pi also features GPIO pins, but they are generally more versatile than those on Arduino boards. They can be used for a wide range of purposes, including controlling sensors and peripherals.
- USB and HDMI Ports: Raspberry Pi offers USB ports for connecting external devices such as keyboards, mice, and webcams. HDMI ports allow you to connect the Pi to displays.
- Expandability: Raspberry Pi’s expandability goes beyond GPIO pins, with the ability to connect to a wide variety of USB devices, HDMI displays, and more.
Programming Arduino
Arduino Integrated Development Environment (IDE)
The Arduino Integrated Development Environment (IDE) is a user-friendly software platform designed to facilitate the writing, compiling, and uploading of code to Arduino boards. Here are the key features and components of the Arduino IDE:
1. Code Editor:
The IDE provides a text editor where you can write your Arduino code, also known as sketches. It supports the C and C++ programming languages, making it accessible to a wide range of programmers.
2. Library Manager:
Arduino IDE includes a Library Manager that allows you to easily import and manage libraries. Libraries are pre-written code packages that simplify complex tasks, such as working with sensors or displays.
3. Serial Monitor:
The Serial Monitor is a built-in tool for debugging and communication. It allows you to send and receive data between your computer and the Arduino board over the USB connection. This is especially useful for debugging and troubleshooting.
4. Verify and Upload:
The IDE’s Verify and Upload buttons are used to check your code for errors and upload it to the Arduino board. The software compiles your code into machine-readable instructions and then sends it to the board’s microcontroller.
5. Code Examples:
Arduino IDE includes a variety of code examples that cover different functions and components. These examples are a great resource for beginners and can be accessed through the “Examples” menu.
6. Board Manager:
Arduino supports various types of boards, and the Board Manager allows you to select the specific Arduino board you are using. It ensures that the IDE generates code compatible with your board’s microcontroller.
C/C++ Programming for Arduino
Arduino programming is based on the C and C++ programming languages. Here’s what you need to know about programming Arduino in these languages:
1. Structure of an Arduino Sketch:
- An Arduino sketch consists of two main functions:
setup()andloop().- The
setup()function is executed once when the board starts or resets and is typically used for initializing variables, setting pin modes, and configuring hardware. - The
loop()function runs continuously aftersetup()and is where you place the main logic of your program.
- The
2. Arduino Libraries:
Arduino provides a vast collection of libraries that simplify complex tasks. You can include these libraries in your code using the #include directive. For example, if you’re working with a temperature sensor, you might include the “DHT.h” library to interface with it.
3. Functions and Syntax:
Arduino code uses familiar C/C++ functions and syntax. You can declare variables, use conditional statements (if-else), loops (for, while), and functions to structure your code.
4. Hardware Interaction:
You can control hardware components such as LEDs, motors, sensors, and displays by writing code that interacts with the GPIO pins on the Arduino board. Functions like digitalWrite(), analogWrite(), and digitalRead() are used to control these pins.
5. Data Types:
Arduino supports common data types, including integers, floating-point numbers, characters, and arrays. Understanding data types is crucial for working with variables and calculations.
6. Libraries and Functions:
In addition to built-in functions for interacting with hardware, you can create custom functions to encapsulate specific tasks and improve code readability.
Arduino Libraries
Arduino libraries are pre-written code packages that simplify complex tasks and extend the functionality of Arduino. Here are some common types of Arduino libraries:
1. Sensor Libraries:
These libraries provide functions to interface with various sensors, such as temperature, humidity, motion, and distance sensors. Examples include the Adafruit DHT library for DHT temperature and humidity sensors and the HC-SR04 library for ultrasonic distance sensors.
2. Display Libraries:
If you’re working with displays, there are libraries available for different types, including OLED, LCD, and LED matrix displays. Libraries like Adafruit_SSD1306 and LiquidCrystal simplify display control.
3. Communication Libraries:
Arduino supports various communication protocols, and libraries like SoftwareSerial, Wire (I2C), and SPI provide communication functions for devices like GPS modules, RFID readers, and other microcontrollers.
4. Motor Control Libraries:
For controlling motors and motor drivers, you can use libraries like Adafruit Motor Shield and AFMotor, which provide easy-to-use functions for motor control.
5. Networking Libraries:
Arduino can communicate with the internet and other devices through libraries like Ethernet, WiFi, and Bluetooth. For example, the ESP8266WiFi library is commonly used for WiFi communication.
6. Audio and Sound Libraries:
If you want to generate sound or work with audio data, libraries like Tone and Adafruit Soundboards are available.
Programming Raspberry Pi
Raspberry Pi is a versatile single-board computer that can be programmed using various programming languages and development environments. Here, we’ll delve into the software aspects of programming a Raspberry Pi:
Raspbian OS
Raspberry Pi typically runs the Raspbian operating system, a Linux-based distribution optimized for the Pi’s hardware. Raspbian provides a stable and user-friendly environment for programming and application development. It includes a variety of pre-installed software and tools for both beginners and experienced developers.
Programming Languages
Raspberry Pi supports a wide range of programming languages, making it accessible to developers with different backgrounds and preferences. Some of the commonly used programming languages for Raspberry Pi include:
- Python: Python is one of the most popular programming languages for Raspberry Pi due to its simplicity and versatility. It comes pre-installed on Raspbian and is widely used for various applications, including web development, automation, data analysis, and IoT projects.
- C/C++: Raspberry Pi can be programmed in C or C++, which provides greater control over hardware resources and is suitable for performance-critical applications. The GNU Compiler Collection (GCC) is readily available for C/C++ development on Raspberry Pi.
- JavaScript: Node.js, a JavaScript runtime, is available for Raspberry Pi, allowing developers to create web-based applications and IoT solutions using familiar web technologies.
- Java: Java can be used on Raspberry Pi for building cross-platform applications. The OpenJDK (Java Development Kit) is available for Raspberry Pi.
- Scratch: Scratch is a visual programming language designed for beginners and children. It is a great way to introduce programming concepts and create simple games or animations on Raspberry Pi.
- Go: Go (Golang) is a programming language known for its efficiency and concurrency support. It is suitable for building high-performance applications on Raspberry Pi.
Integrated Development Environments (IDEs)
Raspberry Pi provides several Integrated Development Environments (IDEs) to simplify the programming process:
- Thonny: Thonny is a beginner-friendly Python IDE pre-installed on Raspbian. It includes features like code highlighting, auto-completion, and a debugger.
- Geany: Geany is a lightweight and versatile text editor and IDE that supports multiple programming languages, including Python and C/C++. It is a popular choice for more experienced developers.
- Visual Studio Code: Visual Studio Code (VS Code) is a highly customizable and feature-rich code editor that can be installed on Raspberry Pi. It offers extensive extensions and support for a wide range of languages.
- IDLE: IDLE is a simple Python IDE that comes with Raspbian. It’s suitable for basic Python programming and learning.
Raspberry Pi GPIO
One of the key features of Raspberry Pi for hardware-related programming is its General-Purpose Input/Output (GPIO) pins. These pins allow you to interact with external devices and sensors, making Raspberry Pi an excellent choice for IoT and embedded systems projects.
Programming the GPIO pins is typically done using Python libraries like RPi.GPIO or third-party libraries designed for specific sensors and actuators. This allows you to control LEDs, motors, sensors, and more directly from your Raspberry Pi.
Libraries and Frameworks
Raspberry Pi has a vast ecosystem of libraries and frameworks to simplify various programming tasks. Whether you’re working on robotics, IoT, web development, or data analysis, you can find libraries and frameworks that suit your needs. For example:
- PiCamera: A Python library for controlling the Raspberry Pi Camera Module, enabling you to capture images and record videos.
- Flask: A lightweight web framework for building web applications on Raspberry Pi. It’s perfect for creating web-based control interfaces for your projects.
- OpenCV: An open-source computer vision library that can be used for image and video processing on Raspberry Pi, making it ideal for computer vision and machine learning projects.
Project Suitability
When to Choose Arduino
Simple, Real-Time Control Tasks:
- Arduino is Ideal: Arduino excels at tasks that require real-time control and precise timing. It’s well-suited for projects like robotics, home automation, and sensor monitoring where immediate responses to inputs are crucial.
Low-Power and Portable Projects:
- Energy Efficiency: Arduino’s microcontroller is designed for minimal power consumption, making it an excellent choice for battery-powered and portable projects. It can run for extended periods without frequent battery changes.
Quick Prototyping:
- Rapid Development: Arduino’s simplicity and user-friendly IDE make it an excellent platform for rapid prototyping. It allows you to quickly test and iterate on your project ideas.
When to Choose Raspberry Pi
Complex Applications Requiring Multitasking:
- Multitasking Capabilities: Raspberry Pi’s powerful CPU and ample RAM make it suitable for projects that require multitasking and the ability to run multiple software processes concurrently. Examples include web servers, media centers, and home automation systems.
Multimedia Projects:
- High-Quality Multimedia: Raspberry Pi’s GPU capabilities enable it to handle HD video playback, 2D and 3D graphics, and audio processing. It’s an excellent choice for multimedia-related projects like home theater setups, retro gaming consoles, and digital signage.
Web Servers and IoT Applications:
- Network Connectivity: Raspberry Pi comes with built-in networking capabilities, making it well-suited for projects that require network connectivity, such as web servers, IoT (Internet of Things) applications, and remote monitoring systems.
Learning and Educational Projects:
- Programming and Computer Science Education: Raspberry Pi is an excellent tool for teaching programming and computer science concepts. It can be used for coding lessons, experimenting with different programming languages, and running educational software.
General-Purpose Computing:
- Versatility: Raspberry Pi’s general-purpose computing capabilities allow it to handle a wide variety of tasks, from web browsing and office applications to software development and data analysis.
Real-World Examples
Arduino:
- Home Automation: Arduino can control lights, thermostats, and smart locks for home automation systems, providing real-time control of household devices.
- Robot Control: Arduino is commonly used to control robotic systems, from small robotic arms to autonomous vehicles.
- Weather Stations: Arduino-based weather stations can monitor temperature, humidity, and other environmental parameters and send data to a display or cloud service.
Raspberry Pi:
- Media Centers: Raspberry Pi can be transformed into a media center using software like Kodi, allowing users to stream content, play videos, and manage their multimedia libraries.
- Web Servers: Raspberry Pi can host web servers, making it possible to create personal websites, blogs, and web-based applications.
- IoT Applications: Raspberry Pi can be used as a hub for IoT projects, collecting data from sensors and controlling connected devices.
Cost Considerations
Arduino Cost
Hardware Cost:
- Arduino Boards: Arduino boards come in various models and price ranges. Basic models like the Arduino Uno are relatively inexpensive, often costing around $20 to $30. More advanced boards with additional features, such as the Arduino Mega or Arduino Due, can be slightly pricier, ranging from $30 to $60 or more.
- Shields and Accessories: The cost can increase when you add shields or accessories to expand the capabilities of your Arduino project. Prices for shields and modules vary widely, but they are generally affordable, with most available for under $20.
Programming and Development Cost:
- Free IDE: The Arduino Integrated Development Environment (IDE) is free to download and use. It provides an easy-to-use platform for writing and uploading code to your Arduino board.
- Open-Source Libraries: Arduino benefits from a vast collection of open-source libraries that are freely available. These libraries simplify interfacing with sensors and devices, reducing development time and cost.
- Learning Resources: Arduino has a wealth of online tutorials, guides, and forums, making it easy to access free learning resources for your projects.
Raspberry Pi Cost
Hardware Cost:
- Raspberry Pi Boards: The cost of Raspberry Pi boards varies depending on the model and specifications. Entry-level models like the Raspberry Pi Zero W can be very affordable, often priced below $10. More powerful models like the Raspberry Pi 4B with higher RAM and processing capabilities tend to cost between $35 and $75, depending on the configuration.
- Accessories: To set up a Raspberry Pi, you’ll need accessories like a power supply, microSD card, HDMI cable, and a keyboard and mouse (if not using SSH or VNC for remote access). These additional components can add to the overall cost.
- Cases and Heat Sinks: While optional, cases and heat sinks can provide protection and cooling for your Raspberry Pi, but they come at an additional cost.
Operating System and Software Cost:
- Raspbian OS: The Raspbian operating system, which is the recommended choice for Raspberry Pi, is free to download and use. It includes a wide range of software packages for various applications.
- Software and Licensing: Some software applications or tools you might use on Raspberry Pi could have associated licensing costs. However, many open-source alternatives are available.
Learning and Development Cost:
- Free Learning Resources: Raspberry Pi benefits from a supportive community and extensive online resources. You can access a wealth of tutorials, documentation, and forums without additional charges.
- Programming Tools: Raspberry Pi supports various programming languages, including Python, which is commonly used and free. You can use a variety of free development tools for coding.
Cost vs. Performance
When considering cost, it’s essential to weigh it against the performance and capabilities you require for your project:
- If you need a low-cost solution for simple tasks like sensor monitoring and basic automation, Arduino is often a more budget-friendly choice.
- If your project demands more processing power, multitasking capabilities, and features like multimedia playback, Raspberry Pi might offer better value for the performance you receive.
Ease of Use
Arduino:
- Beginner-Friendly: Arduino is renowned for its beginner-friendly approach. It is an ideal platform for those new to electronics and programming. Here’s why:
- Simple IDE: Arduino uses a user-friendly Integrated Development Environment (IDE). The IDE provides a straightforward interface for writing, compiling, and uploading code to the Arduino board.
- Easy Programming Language: Arduino programming is done using a simplified version of C/C++. The language is relatively easy to learn and understand, even for those with little or no programming experience.
- Rich Documentation: Arduino offers extensive documentation, tutorials, and examples. The community support ensures that beginners can find solutions to common problems easily.
- Wide Range of Shields: Arduino’s ecosystem includes a wide variety of pre-made shields that can be stacked on top of the board to add functionalities without extensive wiring and programming.
- Learning Curve: Arduino has a gentle learning curve, allowing beginners to quickly start working on projects. The simplicity of the IDE and the availability of pre-built code libraries make it accessible.
- Active Community: Arduino has a large and active user community. This means that if you encounter issues or need help with a project, you can find answers through forums, online communities, and tutorials.
Raspberry Pi:
- Versatile but May Require More Experience: Raspberry Pi, being a full-fledged computer, offers immense versatility but can have a steeper learning curve for beginners. Here’s why:
- Linux-Based OS: Raspberry Pi typically runs a Linux-based operating system (e.g., Raspbian). This can be intimidating for those who have never worked with Linux before.
- Multiple Programming Languages: While Raspberry Pi supports multiple programming languages, including Python, C/C++, and more, the choice can be overwhelming for newcomers.
- More Complex Tasks: Raspberry Pi can handle more complex tasks, which might require a deeper understanding of software and hardware compared to Arduino.
- Learning Opportunities: Raspberry Pi’s versatility provides excellent learning opportunities for those interested in exploring a wider range of computing concepts, networking, and software development.
- Growing Community: Raspberry Pi has a rapidly growing and supportive community. It offers a wealth of online resources and tutorials to help users of all skill levels.
Summary:
In summary, the ease of use for Arduino and Raspberry Pi largely depends on your level of experience and project requirements:
- Arduino is exceptionally user-friendly and suitable for beginners. It is an excellent choice for those who want to quickly start working on electronics and programming projects, especially if they prioritize real-time control and simplicity.
- Raspberry Pi is more versatile but may require more experience, particularly if you’re new to Linux or complex software programming. It offers a broader range of capabilities and is ideal for those looking to delve into more advanced computing concepts.
Connectivity and Networking
Arduino Connectivity
Wired Connectivity:
- USB: Arduino boards typically feature USB connectivity, which allows you to connect them to a computer for programming and power. This makes it easy to upload code and monitor your project’s performance.
- Serial Communication: Arduino boards can communicate with other devices through serial communication, using UART (Universal Asynchronous Receiver-Transmitter) ports. This is useful for connecting to sensors, displays, or other microcontrollers.
Wireless Connectivity:
- Wi-Fi and Bluetooth: While some Arduino boards have built-in Wi-Fi or Bluetooth capabilities (e.g., Arduino WiFi Shield or Arduino Nano 33 IoT), most require external modules or shields to add wireless connectivity.
- RF (Radio Frequency) Modules: You can add wireless capabilities to Arduino projects using RF modules like NRF24L01 or HC-05/HC-06 Bluetooth modules. These modules enable communication between multiple Arduino boards or other compatible devices.
Networking:
- Ethernet: Some Arduino boards, such as the Arduino Ethernet Shield, support Ethernet connectivity, allowing you to connect your project to a local network or the internet.
- IoT Platforms: You can use Arduino in IoT (Internet of Things) applications by connecting it to IoT platforms like Arduino IoT Cloud or third-party services such as AWS IoT or Google Cloud IoT.
Raspberry Pi Networking
Wired Connectivity:
- Ethernet: Raspberry Pi boards often come with built-in Ethernet ports, providing a reliable wired network connection option.
- USB: Raspberry Pi offers USB ports for connecting network adapters, which can be used to add Wi-Fi or other networking capabilities.
Wireless Connectivity:
- Wi-Fi: Most Raspberry Pi models have built-in Wi-Fi, making it easy to connect to wireless networks. You can configure Wi-Fi settings through the Raspbian operating system.
- Bluetooth: Raspberry Pi also supports Bluetooth connectivity for peripherals and low-energy devices.
Networking:
- Local Network: Raspberry Pi can be easily integrated into a local network, allowing it to communicate with other devices and access network resources.
- Internet Access: Raspberry Pi can access the internet directly through a wired or wireless connection, making it suitable for web-related projects, servers, and IoT applications.
- Remote Access: Raspberry Pi can be accessed remotely using Secure Shell (SSH) for command-line access or graphical user interface (GUI) tools for remote desktop access. This enables remote management and monitoring of Raspberry Pi projects.
- IoT Integration: Raspberry Pi is a popular choice for IoT projects due to its built-in networking capabilities. It can interact with cloud services, IoT platforms, and other devices over the internet.
Flexibility and Customization
Arduino:
- Customizing Arduino:
- Arduino is highly customizable, primarily through the use of “shields.” Shields are hardware add-on modules that can be stacked on top of Arduino boards to provide additional functionality.
- There is a vast ecosystem of Arduino shields available, including those for WiFi connectivity, GPS, motor control, LCD displays, and more. This allows you to tailor your Arduino project to specific needs without extensive hardware design.
- You can also customize Arduino projects by creating your own shields or adding external components to the existing board.
- Programming Flexibility:
- Arduino supports programming in C/C++, which offers a high degree of flexibility and control over your projects. You have the freedom to write custom code to suit your requirements.
- Additionally, Arduino libraries simplify the process of interfacing with sensors and devices. You can create your own libraries or modify existing ones to extend functionality.
Raspberry Pi:
- Customizing Raspberry Pi:
- Raspberry Pi’s flexibility and customization options are primarily software-based. You can install different operating systems and software packages to tailor the Pi to your needs.
- Customization also extends to the physical hardware. While Raspberry Pi doesn’t have interchangeable “shields” like Arduino, you can attach various peripherals and sensors to its GPIO pins.
- Moreover, you can modify the Raspberry Pi board itself for specific use cases, such as adding heatsinks for improved thermal performance.
- Software Flexibility:
- Raspberry Pi supports a wide variety of programming languages, including Python, C/C++, Java, and more. This versatility allows you to choose the language that best suits your project.
- You can customize the Pi’s software environment by installing packages and libraries from a vast repository of open-source software. This enables you to build custom applications and services.
- Physical Customization:
- Raspberry Pi boards can be integrated into custom enclosures or cases, allowing you to create a tailored physical appearance for your project.
- You can also design and 3D print custom mounts and accessories to enhance the physical aspects of your Raspberry Pi project.
Security
Security with Arduino
Arduino, as a microcontroller-based platform, has certain security considerations to keep in mind:
- Limited Security Features: Arduino boards are primarily designed for real-time control and simplicity. They don’t include advanced security features like encryption, secure boot, or hardware-based security modules. This makes them less suitable for applications that require robust security.
- Programming Security: Arduino programs can be uploaded and modified by anyone with physical access to the board. If security is a concern, it’s essential to physically secure the Arduino and ensure that only authorized individuals can access and reprogram it.
- Communication Security: When Arduino communicates with other devices or over networks, data security relies on the code you write. Implementing encryption and authentication protocols is possible but may require additional hardware and programming expertise.
- Consideration for IoT: If you’re using Arduino in an IoT (Internet of Things) application, be cautious about security vulnerabilities. IoT devices are often targeted by hackers, so you should implement robust security measures to protect data and prevent unauthorized access.
Security with Raspberry Pi
Raspberry Pi, being a single-board computer, offers more advanced security capabilities:
- Operating System Security: Raspberry Pi typically runs a Linux-based operating system like Raspbian. Linux provides robust security features, including user accounts and permissions, firewalls, and system updates to patch security vulnerabilities.
- Secure Boot: Some Raspberry Pi models support secure boot, which ensures that only authorized and digitally signed software can run on the device. This feature enhances the integrity of the boot process.
- Encryption: Raspberry Pi can implement encryption for data storage and communication. This includes using technologies like SSL/TLS for secure web communication and encrypting files and partitions using tools like LUKS.
- Network Security: Raspberry Pi can be configured to implement network security measures such as firewalls, intrusion detection systems, and VPNs (Virtual Private Networks) for secure remote access.
- Access Control: Raspberry Pi allows for granular control over user access and privileges, making it easier to restrict access to sensitive data and functions.
- Regular Updates: Keeping the operating system and software up to date is crucial for security. Raspberry Pi’s operating system, Raspbian, provides regular security updates that users can easily install.
- Security Resources: The Raspberry Pi community and documentation offer resources and guidelines for enhancing security, including best practices for securing your Raspberry Pi device.
Choosing the Right Platform for Security
The choice between Arduino and Raspberry Pi concerning security depends on your project’s specific requirements:
- If your project requires robust security features, complex data encryption, and secure boot processes, Raspberry Pi is the more suitable choice.
- If your project focuses on real-time control and simplicity and doesn’t require advanced security measures, Arduino may suffice.
- In some cases, a combination of both platforms may be used, with Arduino handling real-time control tasks and Raspberry Pi managing security-related and data processing tasks.
Power Consumption
Arduino Power Consumption
Arduino boards are known for their low power consumption, making them an excellent choice for battery-powered and energy-efficient projects. Here’s a detailed look at power consumption in Arduino:
Key Points:
- Minimal Power Draw: Arduino boards typically have a low operating current, often measured in milliamperes (mA). This means they consume very little power during normal operation.
- Suitable for Battery-Powered Projects: Due to their low power requirements, Arduino boards are well-suited for projects that rely on battery power. They can run for extended periods on small batteries, making them ideal for remote or portable applications.
- Sleep Modes: Arduino microcontrollers often include sleep modes that further reduce power consumption when the board is not actively performing tasks. This is especially useful for projects that require periodic data collection or monitoring.
- Real-Time Control with Low Power: Arduino’s ability to handle real-time control tasks with minimal power draw makes it suitable for applications like wearable devices, remote sensors, and IoT nodes.
- Optimized for Efficiency: Arduino is designed to operate efficiently and can be customized to minimize power usage further by turning off unnecessary peripherals when not in use.
Raspberry Pi Power Consumption
Raspberry Pi boards consume more power compared to Arduino due to their higher processing capabilities and the presence of additional components. Here’s a detailed look at power consumption in Raspberry Pi:
Key Points:
- Higher Power Requirements: Raspberry Pi boards typically have a higher power draw compared to Arduino. The exact power consumption varies depending on the model and the tasks it’s performing.
- USB Power: Raspberry Pi boards are powered through a micro USB port or GPIO pins. The power requirements depend on the model, with newer models generally requiring more power due to increased CPU and GPU performance.
- Consideration for Power Supply: When using a Raspberry Pi, it’s crucial to provide an adequate power supply to ensure stable operation. Insufficient power can lead to instability and crashes.
- Power Management: Raspberry Pi operating systems include power management features that allow you to control screen brightness, turn off unused USB ports, and manage other power-related settings to optimize energy usage.
- Not Ideal for Battery Power: Due to their higher power requirements, Raspberry Pi boards are not well-suited for battery-powered projects that need to run for extended periods without frequent recharging or battery replacement.
- Active Cooling: Some advanced Raspberry Pi projects may require active cooling (e.g., fans or heatsinks) to dissipate heat generated during operation. This additional hardware can contribute to higher overall power consumption.
Case Studies
Arduino in Action
Smart Plant Watering System
Overview:
- Problem: Ensuring optimal soil moisture levels for plants.
- Solution: An Arduino-based automated watering system.
Description:
- In this project, an Arduino board is used to create an automated watering system for indoor plants.
- Soil moisture sensors are connected to the Arduino’s GPIO pins, enabling it to measure the moisture levels in the soil.
- The Arduino is programmed to analyze the sensor data and determine when the plants need watering.
- A water pump is controlled by the Arduino. When the soil moisture falls below a certain threshold, the Arduino activates the pump to water the plants.
- The system also includes a display (such as an LCD screen) that provides real-time feedback on soil moisture levels and watering status.
Benefits:
- Efficient water usage: The system waters plants only when necessary, conserving water.
- Low maintenance: It reduces the need for manual plant monitoring and watering.
- Healthy plants: Ensures that plants receive the right amount of moisture for optimal growth.
Applications:
- Home gardening
- Indoor plant care
- Greenhouse automation
Raspberry Pi in Action
Home Media Center
Overview:
- Problem: Creating a versatile multimedia entertainment system.
- Solution: A Raspberry Pi-based home media center.
Description:
- In this project, a Raspberry Pi is turned into a media center that can play movies, music, and access online content.
- The Raspberry Pi is connected to a TV or monitor via HDMI and controlled using a keyboard, mouse, or remote control.
- The operating system is typically a media center distribution like Kodi, which provides a user-friendly interface for browsing and playing media files.
- The Raspberry Pi can access content stored on external hard drives or network-attached storage (NAS), stream content from the internet, and even play retro video games using emulators.
- Additional peripherals like USB sound cards or Bluetooth adapters can enhance audio capabilities.
Benefits:
- Affordable home entertainment: Raspberry Pi offers a cost-effective way to create a versatile media center.
- Customizable: Users can add plugins, customize the interface, and expand storage as needed.
- Energy-efficient: Raspberry Pi consumes less power compared to traditional media center PCs.
Applications:
- Home theater systems
- Personal media libraries
- Retro gaming consoles
Conclusion
Choosing between Arduino and Raspberry Pi depends on your project’s requirements and your level of expertise. Arduino excels in real-time control and simplicity, while Raspberry Pi offers more computational power and versatility. Consider your project’s complexity, power needs, and budget to make the right choice.
In the ever-evolving world of DIY electronics, both Arduino and Raspberry Pi continue to thrive, offering endless possibilities for creative minds.
FAQ
Can I use both Arduino and Raspberry Pi in the same project?
Yes, you can. Combining their strengths can lead to powerful and versatile projects.
Which one is better for learning programming?
Arduino is excellent for beginners, while Raspberry Pi offers more advanced programming opportunities.
Are there any alternatives to Arduino and Raspberry Pi?
Yes, there are other platforms like ESP8266 and BeagleBone, each with its unique features.
Can I use Arduino and Raspberry Pi for industrial applications?
While possible, it’s essential to assess the specific requirements and consider more robust industrial-grade solutions.
Where can I find more project ideas for Arduino and Raspberry Pi?
Numerous online communities and project-sharing platforms offer a wealth of ideas and tutorials.